
Welcome ! If you are reading this Poon Hill Trek Guide then you are most likely an adventurous soul about to embark on a pretty cool trek, or you are trapped in a 9 to 5 job sitting in your office chair surfing the web and daydreaming about the Himalayas!
Either way, our ultimate goal with this guide is to get YOU prepared for the Poon Hill Trek in the Annapurna Conservation Area quickest and best possible.
Let’s start out by providing you with two pre-conditions for the advice we are about to give you:
- We did the trek in 5 days from 9th to 13th September i.e. in the end of the monsoon season and believe our guide can work for all seasons, but we will ultimately leave it up to your own good judgement to adapt the guide according to your specific situation.
- We did the trek unattended meaning no guides and no sherpas and chose this following consultation with friends who have also done the trek and found that this was a good choice for us. We are not super athletic, but maintain a decent level of fitness, and found it possible to carry everything we needed ourselves. Nor are we master navigators, but the route is very well marked and we could use Maps.me‘s app with an offline map of the area at all times.
So, let’s begin !
We initially found ourselves in Pokhara (the city where most people have their base prior to embarking on a trek in the Annapurna and Himalayas) and we had actually not planned on doing any treks and therefore had also not packed for it!
So when we decided to do the Poon Hill Trek we had to do a bit of online research to make sure that we had everything we needed. We quickly found out that there are a lot of different ways you can do the trek, so this guide is our take on it which is tested on our own bodies.
We will cover the following items which you can scroll to/through as needed, depending on what exact information you seek:
- Preparations for the Poon Hill Trek
- guides / sherpas
- permits
- gear / packing list
- Our itinerary for the Poon Hill Trek
- daily breakdown of the trek
- transportation
- routes & trekking time per day
- where we stayed & what we ate
- experiences on the road
- safe drinking water stations
- daily breakdown of the trek
- What we would have liked to do different
- Our total Poon Hill Trek budget (2 persons)
- Conclusions
- Video from the Poon Hill Trek
– oOo –
Preparations for the Poon Hill Trek
Before you can even start the trek there are a few things you have to make sure you take care of in your preparations in order to make it a success:
Guides / Sherpas:
As stated before we chose to do this trek unattended i.e. without a guide and no sherpa to carry our stuff. We had heard from friends, and read online from other trekkers, that the Poon Hill Trek is relatively easy with a route which is well marked throughout.
We found this to be true and considering the guide cost of USD 20-25 per day and sherpa cost of USD 10-15 per day we ended up saving a lot of money doing so.
That said, we did meet a lot of people who had both guides and sherpas assisting them. Some because they had packed and brought an excessive load of crap (sorry to be so blunt, but it was sometimes ridiculous to see how people had overpacked and just piled it all on a poor sherpa). We guess it comes down to how independent you wish to travel and how challenging you wish it to be.
We also did not use a travel agency to help us with any bookings or obtaining permits. If you wish to do so, you can get an agency to take care of everything for you.
Transport, guides/sherpas, accommodation, food, permits etc. etc..
But we do not see any fun in that … and it will just end up costing you a lot!
Permits:
First and foremost you have to get two permits which will allow you to enter the Annapurna Conservation Area where the trek takes place;
i) the TIMS (Trekkers Information Management System) permit which cost 2000 NPR and
ii) the ACAP (Annapurna Conservation Area Project) permit which cost 2400 NPR
We recommend that you buy both permits from the Nepal Tourism Board which issues both from two individual counters in the building (you will find the building in a courtyard which you access from the main road – follow the link to get directions). It should take you around 10-15 minute if there is no significant queue.
You will need a total of 4 passport size photos for the permits (2 for each application). There are countless passport photo services around the city and a lot near the Nepal Tourism Board, so you can just get it done when you go there.
We ended up paying ~700 NPR for 8 photos.

Gear / Packing list:
Seeing that we had not planned on doing any trekking we had only brought regular clothes, some light sports wear and running shoes with us to Pokhara. We did a quick assessment of our things, took everything aside which we did not need for the trek and arranged with the AirBnB place we had booked for when we returned to store the things till we got back.
Please note that most hotels will offer a luggage storage service too, so you do not need to carry excess weight on the trek. Do your back (or your sherpa if you hired one) a huge favour and pack light! We had one Osprey 70L bag (see link at the bottom of this post) which splits in two giving you a large bag and a secondary smaller bag. Kristian carried the large one and Jenny the small which worked perfect for us.
Pro-tip, use zip-lock bags for sensitive items such as electronics, cash, passport and the like to keep them dry in the event of soaked bags.
We each packed:
- Apparel
- 1 pair of running shoes + 1 pair of flip flops (you want the flip flops, slippers or similar for when you arrive at the guest houses, as you will want to give your feet some air and rest – and dry your running shoes if wet). Note we did not find it necessary to use trekking boots, but if you have some or prefer to rent some then by all means go for it. We managed fine with our running shoes and were happy to have a light tread, even during the muddy parts and crossing countless water streams.
They obviously got wet when it rained a lot, but it did not bother us too much. - 1 pair of zip on/off trekking pants (good to have the zip on/off option for when it gets hot/cold).
- 1 pair of jogging pants/shorts/leggings for when you are in the guest houses.
- 2-3 t-shirts and 1 long sleeve (always opt for fabrics with good ventilation and quick drying function).
- 1 warm blouse or hoodie.
- 1 light rain jacket (very useful).
- 5 pieces of underwear and socks (bring socks with high ankle to make life difficult for the leeches).
- 1 hat / cap to keep your scalp happy in case of some serious sun.
- 1 pair of running shoes + 1 pair of flip flops (you want the flip flops, slippers or similar for when you arrive at the guest houses, as you will want to give your feet some air and rest – and dry your running shoes if wet). Note we did not find it necessary to use trekking boots, but if you have some or prefer to rent some then by all means go for it. We managed fine with our running shoes and were happy to have a light tread, even during the muddy parts and crossing countless water streams.
- Toiletries:
- Toothbrush, toothpaste, toilet paper, bandaid, blister plasters (we never needed these), personal hygiene items, nail clippers, sunscreen etc..
- Bug spray (pro tip: spray your boots/shoes and the leeches are less likely to grab on to them).
- Miscellaneous
- Water purification tablets (we bought 100 but never used one, as there were plenty safe water re-fill stations on the route).
- 2 water bottles (we each had our steel kanteen and 1 plastic bottle as back up).
- 1 liner bag (we did not bring sleeping bags as most guest houses, at least all we stayed at, provide duvets.
- Head / flash light for walking in the dark.
- rain cover for the bag pack.
- quick drying towel.
- 1 set of walking sticks. The sticks were particularly useful during steep stair ascent/decent and very muddy sections for extra support.
- Snacks for quick energy. We brought dried mango, peanuts and two kinds of trekkers fuel -bars (16 in total) with peanut flavour (you do not want to bring bars that include chocolate as they will most likely melt in your bag).
- Passport, camera, mobile phone, chargers, power bank, playing cards, a light book or e-reader, EAR PLUGS (!) etc..
- Cash! There are no ATMs and no one takes credit card on the trek, so bring sufficient cash. We took out 50.000 NPR (~400 USD) which was plenty enough, but better safe than sorry.
Our itinerary for the Poon Hill Trek
We had arranged an 8 o’clock morning transport from Happy Village, Pokhara (where we had stayed at an AirBnB leading up to the trek) to our starting point at Naya Pul with the owner of Nai-Bis Hotel which included a few stops in Pokhara to drop off our excess luggage and pick up our rental walking sticks.
The drive, without our included stops, from Pokhara to Naya Pul took about 1 1/2 hours.
Daily breakdown of the trek:
Day 1 – Naya Pul to Ulleri – Trekking time 4.50 hours
|
From / To |
Time interval |
| Pokhara to Naya Pul with stops for dropping excess luggage and picking up rental gear |
08:00 – 11:00 |
| Hike from Naya Pul to Thikhedunga |
11:00 – 14:00 |
| Lunch @Shankar Guest House: 1 dal bhat, 1 fried noodle & juice |
14:00 – 15:00 |
| Hike from Thikhedunga to Ulleri |
15:00 -16:50 |
| Check-in @Pratap Guest House Dinner: 1 fried veg noodle, 1 veg spring roll & juice Breakfast: 1 musli w/fruit & 1 veg potato mo mo Re-fill of water bottles |
17:00 |
Trek notes:
There are several starting points for the Poon Hill Trek, with most trekkers choosing to start at Naya Pul where the first TIMS check-point is also located. Others choose to start higher up at e.g. Hile.
Starting at Naya Pul takes you through an initial few hours of trekking through cozy rural villages and relatively easy slight uphill terrain following the Bhurungdi Khola river and crossing a few suspension bridges.
We stopped in Tikhedunga and enjoyed lunch there before climbing the infamous 3,500 stone steps leading up to Ulleri. Granted the steps were a bit exhausting, but we felt it was slightly misleading how people tend to make a big deal out of them online, as there are literally steps throughout the duration of the route. So they are more like 3,500 steps out of maybe 30,000. 🙂

Day 2 – Ulleri to Ghorepani – Trekking time 3.10 hours
|
From / To |
Time interval |
| Hike from Ulleri to Nangethanti |
09:15 – 11:30 |
| Lunch @Hungry Eyes: 1 veg fried noodle & 1 pot of ginger tea |
11:30 – 13:15 |
| Trek from Nangethanti to Ghorepani |
13:15 – 14:10 |
| Check in @See You Guest House Dinner: 1 veg curry, 1 veg fried noodle & 1 veg spring roll Re-fill of water bottles |
14:15 |
Trek notes:
Setting off from Ulleri you are still faced by uphill climbing and more stone steps. You are still walking in forest surroundings, but the trail is relatively open.
We faced quite a bit of rain on this stretch which triggered leeches to appear all over the trail. They are small and sneaky and will get on to your shoes, arms, legs or where ever there is an opening if they get the chance to do so. They sit on rocks and in the vegetation waiting for something to pass by which they can latch on to. Try to avoid going into grass or high vegetation where we found they were present in very large numbers. Luckily they are relatively harmless and you won’t die or be in pain if bitten by one. You can e.g. use salt or bug spray to get them to release their bite on you.
We sprayed our shoes with bug spray which helped keep them off to some degree.


Day 3 – Ghorepani to Banthanti via Poon Hill – Trekking time 5:10 hours
|
From / To |
Time interval |
| Breakfast: Poon bread w/jam & porridge |
|
| Ghorepani – Poon Hill – Ghorepani |
10:15 -12:15 |
| Lunch: Veg fried noodle and veg rice curry | |
| Ghorepani – Deurali |
13:35 – 15:45 |
| Deurali – Banthanti |
16:15 – 17:15 |
| Check-in @Shankar Lodge Dinner: 2 veg dal bhat & 1 big pot ginger lemon tea Breakfast: 2 porridge & 1 small pot ginger lemon tea |
Trek notes:
The main attraction of this trek is the view from Poon Hill. Many trekkers wake up around 3 o’clock in the morning to do the 45 minutes to 1 hour hike up to Poon Hill in order to see the moon, stars and eventual sunrise climbing up behind the Annapurna mountain range. When we woke up at 3 it was sadly plummeting rain, misty and cloudy, so we decided to go back to bed and hope for better weather later in the morning. Again, we were left disappointed when we woke up the second time around 8 o’clock.
We tried putting on a brave face, had some breakfast and decided to trek up to the top anyway, at least to get a picture to prove that we actually made it there. 🙂
Arriving at the top we can easily imagine how amazing the view would be on a clear day. What we saw, however was just gray mist. So we can regrettably not write how spectacular the view is, but we hope that you will have better luck than us.
Coming back down we had lunch at the same place we had slept before moving on towards Ghandruk. The original plan was to make it all the way to Tadapani, but since we had gotten a late start to the trek, we only made it to Banthanti before it started getting dark. This was, however a positive experience as we stayed at a place with a really friendly host in the middle of dense rainforest.


Day 4 – Banthanti to Ghandruk – Trekking time 4:05 hours
|
From / To |
Time interval |
| Banthanti – Tadapani |
9:20 – 10:40 |
| Tadapani – Ghandruk |
11:15 – 14:00 |
| Check-in @Hotel Old Village Dinner: 2 dal bhat veg Breakfast: 2 porridge with fruit & tea |
Trek notes:
For this stretch we knew that we had plenty of time to arrive in Ghandruk before dark, so we took it slow and really allowed ourselves to take in the rainforest surroundings. From Banthanti to Ghandruk you start going down hill quite a lot with many stone steps winding through the dense rainforest and waterfalls. It was like finding ourselves in an elvish world where the lady of the forest could appear at any time (LOTR reference to those who think “what are they babbling about”).
At one spot we found rock formations scattered across the path which we believe locals or trekkers (or elves!) had built. It was quite magical.
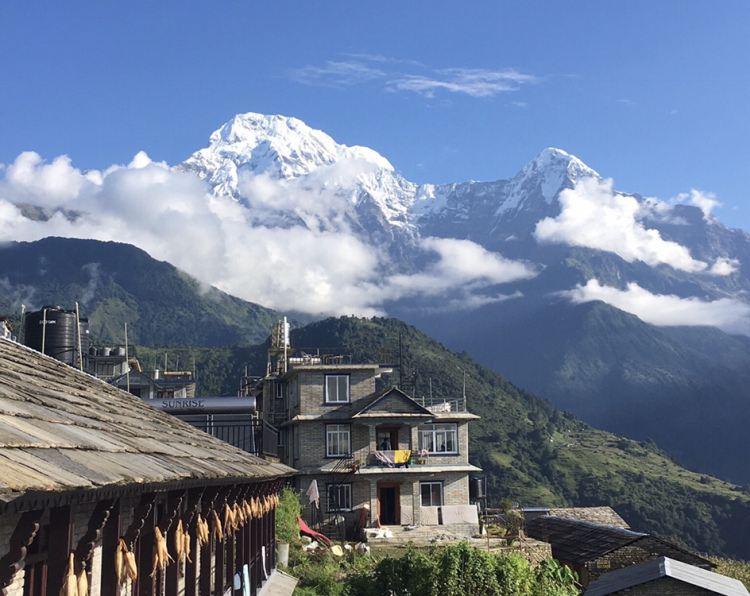
Upon arrival in Ghandruk it was easy to see that this was the largest of the villages we had come by and there was a much more commercial feel to the guest houses. They were less friendly and inviting and seemed to see us more like customers than guests. We hope this is not the general feeling people get from this place, but it was the impression we were left with.


Day 5 – Ghandruk to Kimche (and back to Pokhara) – Trekking time 1.20 hours
|
From / To |
Time interval |
| Ghandruk – Kimche |
09:00 – 10:20 |
| Kimche – Pokhara |
11:15 – 16:30 |
Trek notes:
Waking up in Ghandruk proved to be a good experience, however as the skies had cleared for a brief instance to give us a glipse of the long sought after mountain view which had so far escaped us. For an hour or so we could just sit and take in the views before the clouds came in again covering up the small patches it had left open for us. Maybe this was mother nature giving us a little break and not letting us leave without seeing what she can offer on a good day. 🙂 One thing is for sure, we will have to come back for more, because we are not yet satisfied by what little we did see.
From Ghandruk you can trek up to Jhinu Hot Springs, which we would have done if we had the time, or in many other directions. Most people head down towards Naya Pul to end the trek. Being a bit pressured for time we did a short trek down to Kimche and took a tourist bus all the way back to Pokhara from there. The trek is relatively easy, however due to recent landslides parts of the trail had been washed away leaving us with only one option, being crossing the actual landslide! This was a bit daunting, but we managed to get through without any injury or nearby accidents.
As written, you do not have to end your trek in Kimche, but it is one option and the one we had to take this time around. The remaining trek down to Naya Pul would be steep downhill through rice fields and winding roads passing one small village after the other. We saw several trekkers en route passing them with the bus and they all looked like they enjoyed going downhill. 🙂

Safe drinking water stations:
You can re-fill your water bottles with safe drinking water in the following cities (subject to change):
- Ulleri – Banthanti
- Ghorepani
- Tadapani
- Ghandruk
- Chhomrong
- Jhinu
What we would have liked to do different
- Done the trek slightly later for better visibility and less rain. Likely around start October.
- Had 1 more day to visit the hot springs in Jhinu.
- Only rented 1 set of hiking poles.
- Hired a jeep for the transport back to Pokhara from Kimche.
Our total Poon Hill Trek budget (2 persons)
Accommodation*: 500 NPR
Snacks: 1.500 NPR
Food / water re-fill: 11.000 NPR
Transport to/from the trek (taxi out, local bus back): 3.200 NPR
Gear rentals (walking sticks): 1.600 NPR
Gear purchase (rain cover, sleeping liners): 2.600 NPR
Permits: 8.800 NPR
Total trek cost: 29.200 NPR / ~250 USD
*All places we stayed, apart from Ghandruk, gave us free accommodation if we bought dinner & breakfast. We are not sure if this goes throughout the season, but it worked for us as we trekked during off-season. You can always try and ask discretely when you arrive at the different guest houses.
Conclusions
In conclusion the Poon Hill Trek lived up to and exceeded our expectations. Even if we did not get to see the Himalayan mountain view this time around, which really is the primary reason for doing the trek.
The small rural villages and their people are friendly, welcoming, smiling, chatting and authentic. The nature is lush, dense, wild and untamed. The path is rugged, changing, slippery, steep and winding. The food is tasty, plentiful, filling and nourishing. The weather is devious, surprising, warm, cold, wet and dry.
We would recommend everyone who has time to spare in Pokhara to do the Poon Hill Trek. As written you can adjust the trekking route to your needs and add destinations as you see fit. There are a lot of small villages branching off the main trek which all have their individual charm and stories to tell.
We will definitely be back and will likely take on Annapurna Circuit or Annapurna Base Camp next time! We have been bitten by the trekking bug and we like it!
Video from the Poon Hill Trek
Cheers, Jen & Kris
Follow us on
Instagram: www.instagram.com/nomadnorthlings
Facebook: www.facebook.com/nomadnorthlings
Youtube: Nomad Northlings
Blog: www.nomadnorthlings.com
Amazing content, thank you guys for sharing…